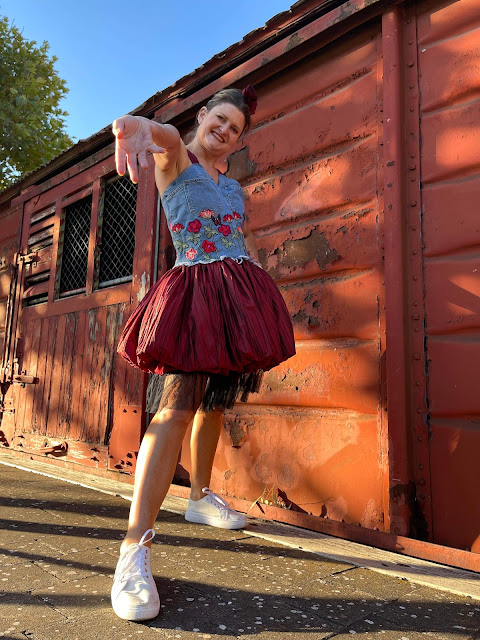
Upcycled Grunge Dress
Linda wearing her new dress. Photo by Dean Kyritsis
Sewing Pattern Review (www.sewing.patternreview.com) is a website for people to share their reviews of sewing patterns they have made up. SPR hold monthly contests for members to participate in. March 2022 was Upcycle Contest: take one or more existing garments and making them into something totally new.
I joined the contest with 10 days left to make something. I went to my local Op Shop where an embroidered denim mini skirt caught my eye, I found a taffeta dress that complemented the red of the embroidered flowers so I bought both to up cycle into something new.
Embroidered denim skirt size 10 $8
Crushed texture taffeta dress size 36 $15
Design
Once home I unpicked the skirt at the side seams and cut through the waist band so I had the front and back as two seperate pieces.
I pinned these in different ways onto my dress model until I came up with something that worked as a top. Due to the original size of the skirt I knew I would only be able to make a garment in a size 10-12. I called a friend and asked her if she wanted a free dress if she agreed to be my muse and model. She jumped at the idea as she loves taffeta and dressing up.
Skirt back pinned to front of dress form, taffeta dress waist sash used as shoulder straps.
Curved side seam and the bust dart temporarily pinned in place.
Skirt front pinned to back and pins marking the shape of the back for cutting
This gave me the basis for the bodice of the new dress, now it needed a skirt.
Skirt
The taffeta dress had a bodice detail that wrapped around and joined into the skirt of the dress. I unpicked the bodice wrap detail from the skirt, then cut the skirt off the bodice 1" above the waistline. I left the skirt lining attached to the skirt as they were joined at the waist.
The amount of fabric in the full length skirt was substantial, the pleated texture added structure and fullness. I was inspired by the bubble skirt from the 80's and 90's.
Vogue 9893 prom dress pattern
I gathered the hemline up on my overlocker then added pleats until the hem fit the waist line exactly.
I pinned the top and skirt onto my dress form and took a picture. Sometime I find it helpful to see the design on the small screen as it gives a better eye for proportions.
I decided the skirt wasn't poofy enough so I added a pleated net insert inside the bubble to give it volume.
So I had the bodice and skirt pinned together to fit the measurements of my friend. We did the first fitting and I only needed to adjust the depth and position of the bust darts.
Bust darts hidden under patch pocket
New back shaping pinned in place
Bodice
The front seam of the bodice was tricky. The denim skirt was designed to look like it was made from shorts and had the curved crotch seam at the front and the back. This was then embroidered over which added a lot of thickness.
I wanted to preserve as much of the embroidery as possible so I had to curve the seams to fit the shapes of the flowers in the sides and front.
I couldn’t do a normal seam because of the curves so I ended up hand tacking the seams then machine sewing them.
I used the waist ties from the taffeta dress as the shoulder straps.
At one stage I toyed with the idea of adding the denim waistband as a feature to the bodice but after some consultation I decided it was too heavy overall to the design.
Because of the thickness of the denim and embroidery I couldn't insert a concealed zip so I chose a dark red zip instead and made it an exposed feature.
I cut and overlocked the edges of the centre back then pinned the zip over the overlocking and topstitched it in place.
The exposed zip was also vintage
I continued the classic denim topstitching across the bodice top and front v neckline in a tan thread.
The skirt is simply sewn to the bodice at the waist with a row of topstitching in denim coloured thread
I used the lining from the taffeta dress to line the denim bodice.
The taffeta dress had two rosettes on it, one on the neckline and one at the waist. I sewed these together and then sewed a clip to them so Linda would have a matching hair accessory.
Photos by Dean Kyritsis


