Cityscape - Art Quilt
Dare to Differ is a quilt exhibition held every two years in South Australia. It is designed to push the boundaries of the contemporary art quilt with the use of fabrics and other materials like paper, plastic, sheer fabrics, embellishments, texture and printing.
The interpretation of the guidelines is up the the entrant. At the last Fibre Artist Network (FAN) meeting I attended in August there was a discussion as to how to make a 3D quilt from 2 layers of fibre stitched together while still maintaining a quilt format. One of the rules state "The work must possess the basic structural characteristics of a quilt and must be predominantly fibre comprised of at least 2 layers stitched together".
This is my idea and the process it takes to complete my entry for this exhibition.
-
Inspiration
One the drive home from Adelaide I thought about this challenge, I liked the idea of a cityscape with the layers of buildings pressed together. I googled some images of city scape's and was particularly taken by this one.
I am drawn to the blue, red and gold lighting in this picture contrasting against the black building surfaces. They tie in well with the dawn light in the distance.
2. Format and Design
From this photo I decided on a view from the front like you would get from a body of water looking towards the skyline.
I then drew 3 layers of buildings creating the background, foreground and middle. Spreading out the buildings and reducing the size with each layer.
2. Format and Design
From this photo I decided on a view from the front like you would get from a body of water looking towards the skyline.
I then drew 3 layers of buildings creating the background, foreground and middle. Spreading out the buildings and reducing the size with each layer.
 |
| Background |
 |
| middle |
 |
| foreground |
From this image I decided to make my quilt in three stages so that the final hanging quilt has layers of background, middle ground and foreground. The scale drawing allows me to measure the sizes of each building and upscale them to fit the 2m wide final project height. I have begun drawing the full sized buildings, pictured below with the A4 drawing of the scene for scale.
I have a selection of fabrics ready to start making the individual buildings which is the next step. Stay Tuned!
Part 2 of the Dare to Differ quilt
The life size pattern is complete with each building made individually so I can use it to create the fabric version.They say measure twice, cut once and I guess I should have followed that format as some of my buildings are out of proportion to the rest so I had to resize them.
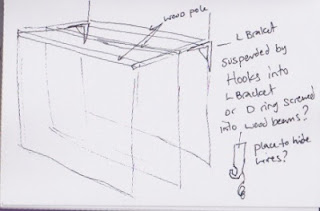
The three layers of buildings don't have the right look when simply placed over the top of each other and not suspended with a gap between the layers. I have had a look at the gallery the exhibition is to be held in to get an idea of how to mount the quilt.
I can't hang it from the ceiling as there are rows of drop spotlights accross it so I will have to make a fixture that hangs on the wall from the wire picture hooks suspended from the ceiling.
On top of the shelf brackets will be lengths of metal which will support the other two cross beams holding the foreground and middle ground layers.
This is a working theory for now until I get the quilt finished and ready for hanging.
 Now it's time to play with the fabrics.
I started by making a couple of test layers with different fabrics including the striped organza and lame'.
I freehand machine embroidered geometrical patterns representing windows and brickwork over the sandwich of fabrics. I then cut away some of the top layer inside the stitched pattern to reveal the metallic lame'.


I found a foiled stretch fabric with small gold squares all over it that reminded me of a buildings windows.
I stitched freehand around random gold squares in yellow and blue.


This sample shows a striped metallic eyelash fabric over burgundy organza with the bottom layer bronze lame'.
Blue embroidery stitching define the stripes of the eyelash fabric and yellow geometric squares fill in the space between.
This is a picture of the back of the sampler showing the stitching lines more clearly.
The next step is to create an actual building from fabric. I ironed Vlisofix to the back of some black silk dupion. I cut precise strips to make the lines of the building design.
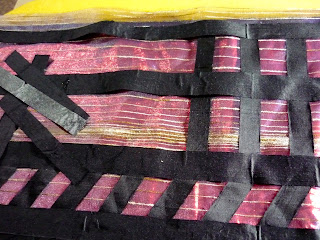
On a base of black cotton drill I laid some red lame', with a purple striped organza on top. Then using the pattern I laid out the columns and cross beams of the structure.
I ironed all the strips down with a small iron tool as the organza shrinks when heat is applied to it.

I stitched the vertical beams to the fabric sandwich to secure all layers together.
I cut the fabric back to the seam allowance and stitched another layer of the black cotton fabric to the right side leaving an opening at the base of the building. I turned through the building and pressed it flat.
The next step is to embroider the final patterns onto the building and cut back some of the organza to show the lame'
Here is another building under construction.
Cityscape on display in Gallery M, photo by Suzanne Gummow
The completed buildings laid out on the floor
The background skyscrapers stitched to a net background
Three layers of buildings stitched to net and laid out flat on floor.
The three layers spaced apart 50cm and hung up in sequence with a
large piece of cardboard behind them.
The middle and background have a softer effect because of the layers of net between them.
Each row has been suspended 50cm from the next. This distance proved to wide for the hanging mechanism and was reduced to 30cm on the final fit.
Close up of front building.
It's a bird, it's a Plane, no it's Super Sam!
The three quilts are displayed to give a 3D effect using a metal rod system. The rods screw together through the centre wood support. Wire attaches to each side with flat metal pieces and fishing swivels. Because the back quilt is heavier than the front quilt the wire circle they are suspended from is off set to the back to balance the art so it hangs straight.
Having constructed the quilt I had a test hand in my lounge. With the three layers hanging together there was an unbalanced gap in the front quilt so I mad an additional building which was sewn to the front quilt to better balance out the scene.
Here is the quilt hanging in Gallery M at Marion, on display with other amazing creations in"Dare to Differ" exhibition October 2013. SOLD August 2014
Here is the quilt hanging in Gallery M at Marion, on display with other amazing creations in"Dare to Differ" exhibition October 2013. SOLD August 2014


